Showing posts with label baby. Show all posts

Monday, August 11, 2014

tutorial: burp cloth, bib, and lovey set for baby

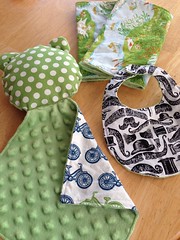
Here's a great little gift set that uses half a yard of quilting cotton plus half a yard of super soft minky, and sews up quickly too! Included are two burp cloths, a bib, and a cozy lovey for baby to snuggle.

Untitled

I'll also give you a couple of tips to make working with slippery minky a lot easier. I've quilted with minky before, and I guest-posted over at Sewtakeahike a couple of years ago about the experience, if you're interested.

On to the tutorial!

Supplies
 
Untitled
 
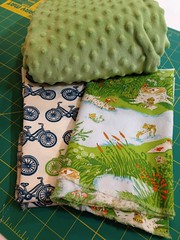
  • Half yard of quilting cotton (I'm using a combination of frogs, bikes, dots, and moustaches)
  • Half yard of minky (I found mine at JoAnn... you can find it with dots, stripes, or stars, and in a variety of colors)
  • Set of snaps or velcro (I used sew on snaps)
  • Pattern for the bib and lovey
  • Scrap of batting
  • Polyester fluff for stuffing
  • Sewing supplies (machine, coordinating thread, hand sewing needle, scissors, rotary cutter and mat)

Notes

I pre-washed and dried the cotton and the minky... I wanted to pre-shrink it (the cotton) and get as much lint off the minky as possible--- I know baby items end up in the wash all the time, so this is a good idea if you'll be giving these as gifts!


Also, this is one of those projects where your sewing machine will thank you for starting with a fresh needle. And a sharp blade on your rotary cutter. Plus, when you're through, make sure you clean the minky lint out of your machine!


The Burp Cloths
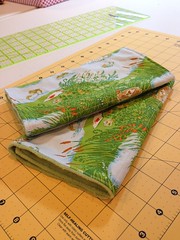

Untitled


Having used a lot (and I mean A LOT- Emma spit up regularly as an infant) of burp cloths, I got a good feel for what criteria were necessary to make a good one.


Number one at the top of my must-have list for a burp cloth is multiple layers... it has to be absorbent! I ended up with many burp cloths that were a single knit layer and totally useless after five minutes. Also important is texture... you'll want something nice and soft against baby's skin!

This burp cloth was originally inspired by MADE's tutorial. I changed the measurements to better fit my needs. I also altered the construction a little to make it easier... you'll see how in a minute!


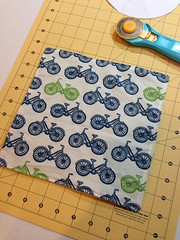
1. Cut two rectangles from your quilting cotton that measure 9 x 16 inches. Cut two rectangles of minky that measure 10 x 17 inches.

Untitled


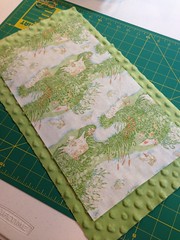
2. Pin one rectangle of cotton to one rectangle of minky, wrong sides together.

TIP: Originally I cut both pieces the same size, and the minky slid all over the place during pinning and sewing. If you cut the minky bigger, you get a little wiggle room for sliding. But you still need to pin! And pin well! Learn from my mistakes, people. :)


3. Sew around all sides using a 1/4" seam allowance and the edge of the quilting cotton as your guide.

TIP: Use your walking foot, if you have one, and go at a moderate speed. If you go too fast, the minky will really shift everywhere!


Leave a 3" gap on one short end for turning. Trim the excess minky away from the seam allowance. Clip the corners and turn inside out.
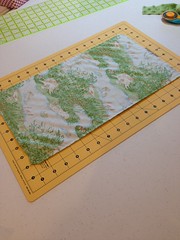


I like to use a bone folder to make the corners nice and crisp... it has a nice point like a knitting needle or chopstick but won't go through the corner if I accidentally push too hard.


4. After you poke out the corners, press the burp cloth on the cotton side with your iron on a low setting. Minky is a polyester fabric and not really meant to be ironed, so we're just smoothing out the wrinkly cotton.


5. Pin the opening closed and topstitch around the edge of your burp cloth, about 1/8" away from the edge. This closes the opening at the same time.


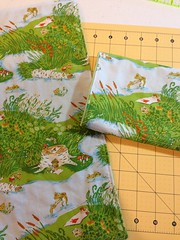
6. Fold the burp cloth in thirds and mark the folds. (I used my bone folder to do this, or you could use a hera marker.) Sew on these marked lines. This just makes it easier to fold the burp cloth, plus it minimizes the shifting of the layers.

Untitled


Make the second burp cloth just like the first!


The Bib
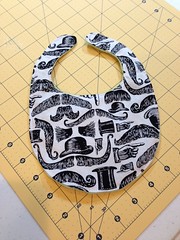


1. Print out the pattern for the bib and cut it out. Lay the template on an 8 x 10" square of quilting cotton and cut around it carefully with your rotary cutter or scissors.


2. Lay the cut piece of cotton on an 8 x 10" square of minky, right sides together. Pin the cotton to the minky. Sew around the edge, using the cotton as your guide, with a 1/4" seam allowance. Leave a 3" gap on one long side of the bib for turning.
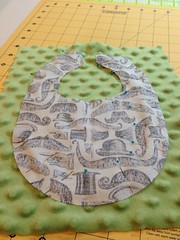

Untitled


3. Trim the excess minky away from the edge of the cotton. Clip into the curved edges of the seam allowance (but not all the way!) and trim some bulk around the curved pieces that go around the neck.


4. Turn the bib right side out (I used my bone folder again to get into the narrow channel of the neck straps.)


5. Press the bib on the cotton side.


6. Pin the opening closed and topstitch around the edge of the burpcloth, about 1/8" away from the edge.
7. Sew on the snaps or velcro, following package directions.
Done!

The Lovey
Here's a little secret about loveys... if Mama sleeps with a lovey for a couple of nights, it will take on her scent. This can comfort Baby in his crib at night!

1. The first part is just like making the burp cloth. Cut a piece of cotton 9 x 9 inches and a piece of minky 10 x 10 inches. Center the cotton on the minky, right sides together. Pin, sew around the edge with a 1/4" seam allowance, and leave a 3" opening for turning.
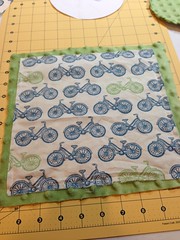
Untitled
2. Trim the extra minky. Clip the corners and turn. Poke out the corners. Iron on the cotton side and pin the opening closed. Topstitch around the edge. This is now called the "lovey blanket". Set aside.
3. Print and cut out the lovey head and ear pattern pieces. Follow the cutting instructions on the pattern page and cut one head from cotton (exact size of template) and one from minky (about 1 inch larger than template all the way around). Also, cut two ears from cotton and two from minky.


4. Pair one cotton ear with one minky ear right sides together. Sew around the curve and clip the curved seam. Turn right side out and finger press. Repeat with other cotton ear and minky ear.


5. Sandwich the ears between the two head pieces which are right sides together. Sew around the cotton head using a 1/4 seam allowance and catching the edges of the ears. Leave a gap for turning. Clip around the head and turn right side out.
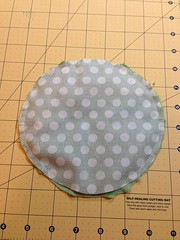
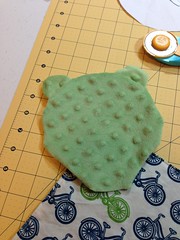
6. Stuff the head as firmly as you like. Turn the edges of the open seam under. Insert one corner of the lovey blanket and hand  or machine stitch closed. Make sure the opening is closed securely as these items will be loved and washed regularly!
 

And there you have it!
Untitled
I'd love to know if you use this tutorial to make a gift set for a special baby! Also, if you need clarification on any of the steps, email me and I'm happy to help!

Thursday, September 1, 2011

are you interested?

WANTED: A patient soul who can get up at night with a hungry little monster at least 3 times.

Qualifications: Willing to part with sleep during nighttime hours. Needs good ears for hearing baby noises. And must be able to change a squirmy baby's diaper. Must be quiet so Mommy and Daddy can sleep!

Salary: My undying gratitude and devotion. Also, breakfast in the morning. If you're awake, that is. :)

Thursday, August 11, 2011

hello, baby!

Photobucket

Emma Catherine

Photobucket

was born on Friday, August 5th, at 9:00 AM
Weight: 7 pounds, 3 ounces
Length: 18 3/4 inches

Photobucket

We spent four days in the hospital following my c-section. Baby Emma was breech from 36 weeks on, and didn't turn back to a head down position.

Here we are a few minutes after getting home from the hospital on Tuesday...

Photobucket

And here is our little cutie yesterday...

Photobucket

We are so blessed!

Wednesday, August 3, 2011

a tour of the nursery

Baby's nursery is ready to go! And just in the nick of time, too. I've always been a procrastinator. :)

Really, the room has been ready for a while, just chaotic and disorganized. It's a small space and Baby has so much stuff to pack in there! We started in March by painting and ordering the furniture. Slowy but surely, I've been finishing projects for the room, like the wreath, the crocheted throw, a mini quilt, and a toy net.

Here's the whole room. I stood outside the door of the room to take this picture! The window is on the south wall; the crib is on the east wall.

Photobucket

Here's the west wall, with the changing table/dresser unit. I have a fun wall hanging planned for the big empty space above it.

Photobucket

This is the mini quilt I made that hangs above the crib.
Photobucket

Baby has already amassed quite the collection of stuffed animals. (Okay, okay, you beat it out of me. They were mostly all mine and have been in storage for years because I couldn't bear to get rid of them.)

Since it's not a good idea to line her crib with animals, I wanted to buy a toy net to hang in the corner of her room. As I was looking around online I realized that I could crochet one very easily and for free with yarn from my stash, rather than shelling out $15 to buy one.

After a brief online hunt for an easy pattern, I dug out some cotton yarn and made a simple triangle. It's super cute and matches the colors already in her room, however it's really small and only holds three stuffed animals! I actually like that it's not huge, but if I did it again I'd definitely make it bigger.

Photobucket

Now, what do I do with the rest of the storage bin of stuffed animals? Turns out, I haven't really solved my problem yet. :)

Big Bunny is snuggled in between the crib and the closet doors.

Photobucket
Today, Hubby helped me organize the room and clean out the closet to make room for more stuff. We're ready to go!

Thursday, July 28, 2011

baby update {38 weeks}

I told my hubby he should take a picture of me in my favorite spot... on the couch, lol. I didn't actually think he'd do it, but he did. Here I am in all my preggo glory! (Eek)

Photobucket

Wednesday, July 27, 2011

baby hat

I wanted to make a hat to match the Star Booties for Baby to come home in... since we're at the height of a super hot summer, I knew it needed to be lightweight and airy. I found a great pattern from Aesthetic Nest, called the Picot and Lace Baby Cloche. Overall the pattern was really easy to follow and quick to crochet.

Photobucket

The only problem I have is that I always doubt myself when it comes to sizing baby items. I'm hoping it fits Baby's head! It looks soooo small.

By the way, Aesthetic Nest is really worth checking out. Anneliese has some great crochet tutorials for baby, kid, and adult items, as well as party ideas and sewing patterns.

Monday, July 25, 2011

tiny... so tiny

I knew that eventually I'd end up crocheting a baby hat and booties for Baby (who is still in the breech position, by the way. Stubborn girl.). Hubby said a few nights ago that he was surprised that I hadn't done it by now, and I'm kind of surprised at myself, too. After all, there are only about two weeks left until she arrives!

We went to Barnes & Noble last week and I picked up this book because I loved the Star Booties. My first attempt was a teeny tiny booty that was cute but also a bit on the wonky side. It was supposed to measure 3 1/2 inches but barely ended up at 2 inches.

Photobucket

My second attempt was more successful. It's the right size and not wonky. Best of all, the third booty actually matches the second in shape and size!

Photobucket

I'm also doing a hat, but having some issues with it. We'll see how things go.

Monday, July 18, 2011

dear weatherman,

I know what you're doing.

I know you're fudging the numbers.

I know it HAS to be over 100 million degrees outside. I can see things melting outside like that Perrier commercial. But you say it's 95. I could handle 95. It's NOT 95.

You lie. It's HOT. I'm HOT. I turn the AC waaaay down and sit under a fan during the day and I sleep (or try to) with two fans pointed at me at night. And still, I'm HOT.

Stop fibbing and tell the truth. I won't get mad. Also, please arrange for a much lower temperature so I can lose the fans and AC and my husband can defrost.

Respectfully,
Carmen

P.S. If you tell me it's because I'm 37 weeks pregnant or it's because of my hormones, I might have to be offended.

Wednesday, July 13, 2011

baby update ~ 36 weeks

Well, we've had a bit of a hiccup... literally and figuratively. Baby gets the hiccups between three and five times every day... sometimes her hiccups are so strong that you can see my belly jumping around!

Here she is today... we're looking at Baby's face... she had her back to the ultrasound tech so we mostly saw her spine and ribs. No good profile photos, unfortunately.

Photobucket

Figuratively speaking, things weren't as peachy today at my doctor's appointment as they've been throughout my pregnancy. Baby had been head down the last few weeks, but decided that she needed to spend last week maneuvering into a head up position.

Whoops.

We'll be keeping an eye on her through ultrasounds for the next few weeks, so hopefully she'll turn back the way she's supposed to be!

Photobucket
Here I am in all my belly-rific glory!

Thursday, July 7, 2011

baby update ~ 35 weeks

Oh boy. I don't know how other women do it. I still have five weeks to go, and I'm pooped! I get tired and out of breath so easily these days. (Thank you, uterus, for jamming up under my lungs.) I haven't slept through the night in at least four months, and I have to go to the bathroom every two hours or so.

I live in search of AC and fans... I don't go anywhere that doesn't have them!

 If I was still in school, I'd cry. Women who work until their due date are better women than I am.

I had a doctor's appointment this morning. Baby Girl is head down, heartbeat is strong, dilation is zero, everything looks great! I'm at the point where OB appointments are weekly, and I have an ultrasound next week.

My craftiness has almost disappeared... I partially pieced a mini quilt last week, and it languishes on a chair, waiting to be ironed. I have no desire to drag out the iron or sewing machine to work on it. Maybe I could crochet instead?

Monday, June 6, 2011

what are the odds i'll use all this stuff?

Besides the car seat cover and the burp cloths, I've made a couple other things to use when the baby comes.

I really don't know if all these baby things will be necessary, but they are so stinkin' adorable that I can't help myself! Plus, I know that I won't have a whole lot of time or inclination to be crafty after Baby's born, so I should do it now while I can, especially since school's out.

At any rate, I used Noodlehead's tutorial to make a diaper pouch. I'm not sure if I'll use it in the diaper bag or keep it in the car as a spare stash.

Here's the front,

Photobucket

and the back.

Photobucket

I also used Diary of a Quilter's tutorial to make a nursing cover.

Photobucket

Speaking of Baby, I had an ultrasound on May 20th, and here's my little girl!

Photobucket

And her tiny foot! (which she has been learning to use very effectively!)

Photobucket

Tomorrow is 31 weeks... only 9 weeks to go before we meet her!

Thursday, June 2, 2011

snippet of a dream

I tend to have vivid dreams. Very often, things I'm preoccupied about or anxious about manifest themselves in my dreams. Topics range from projects I'm working on to school to personal relationships.

In one of my dreams on Wednesday night, I was feeling the baby move a ton, and watching my stomach move along with her. All of a sudden I see a tiny handprint pushing outward on my stomach, and it came out so far I was able to interlock my own fingers with hers. It was pretty cool.

But then it got freaky. Baby kept pushing her hand further and further out until it POPPED out of my stomach! I shoved it back in as fast as I could and pressed my hand over where the hole should be, expecting blood and guts and other disgusting stuff to pour out of me, but when I didn't feel any pain and moved my hand, there was nothing there. My pregnant belly was the same as before.

Weird random dream or a peek into the inner workings of my subconscious? Discuss. :)

(And because I don't like pictureless posts, here's a shot of the Hexagon Throw in the nursery. Love it!)

Photobucket

Wednesday, June 1, 2011

more baby projects

It's been another productive sewing week! Yesterday, I used Diary of a Quilter's tutorial to embellish six burp cloths for the baby...

Photobucket

I know they'll just get all gross and icky, but for now they're so cute!

Photobucket

Today I used Cluck Cluck Sew's tute to make a car seat cover. Don't want any weird people touching my daughter!

Photobucket

Photobucket

I've also finished a couple of things for the nursery, and I'll post pictures of Baby's room soon!

Thursday, May 26, 2011

uh oh

So I'm on a roll... in the last few days I've finished the crochet blanket, the butterfly wall hanging (SO CUTE! But that's for another post) and now I've started working on the crib skirt.

I was ironing the cheap pre-made skirt I got at Target (it's a white, full sized bedskirt, but I trimmed it down) when I put the iron down on the part that goes under the mattress and it instantly MELTED! There's a giant hole there now. I turned the iron off immediately, and now that it's cool I need to make sure it's not ruined.

If it is, I'll have to go out and get a new iron. Bummer.

I'm not worried about the hole- it can be easily patched or I can just leave it... that part will be hidden anyway.

Photobucket

Edited to add: The iron was ruined, so I went and got a new one, plus a cute new ironing board cover.

I trimmed down the bedskirt so it would fit the crib, and when I tried it on the crib, I realized that any embellishment I do on it will be pretty much hidden by the wide slats of the crib. I ended up just leaving it plain white. No big deal, it was only $4 on clearance!

Monday, May 23, 2011

it's done!

I love this hexagon blanket. I really, REALLY love this blanket!

Don't get me wrong. It was a pain in the rear to count and recount all the hexagons, and to run out of yarn (twice) and it was a giant pain to weave in all the ends, but the end result is worth every minute.

Photobucket

As I was taking pictures of the blanket, I got my green and white striped belly in one of them. Gratuitous belly shot time!

Photobucket

Baby Seaschell is healthy and growing big... she's almost three pounds now, and moving and kicking and gyrating and dancing and jumping every day! I swear, this girl is going to be a gymnast.

Friday, May 6, 2011

hexagons

Somehow I got it into my head that I had to finish the crochet hexagon blanket before finishing or starting any other projects. Not sure why- I've worked on multiple projects at once many times before, but I think in the back of my mind I'm afraid this one could disappear into the Black Hole of Unfinished WiPs and I really don't want that to happen.

Photobucket

As of right now I'm a little more than halfway through with hexagon construction. This doesn't mean the blanket is halfway done because I still need to sew them together, but I'm hoping that won't take as long as making all these hexagons!

Saturday, April 23, 2011

butterfly wreath

I've seen yarn-wrapped foam wreaths all over the internets, and wanted to make one for the baby's nursery. You can see variations here and here.

I've sort of developed a bit of a butterfly theme in her room, but don't tell my hubby because he'll think that's WAY too girly. :) At any rate, I decided a butterfly wreath would be very sweet on her wall.

I wrapped a 12 inch foam wreath with white yarn, and set about crocheting butterflies. I had a hard time finding a pattern that I really liked. The first one looked too much like a flower,

Photobucket

and the second one was only okay.

Photobucket

This one came close, but it still wasn't perfect. So I tweaked it, and this is what my version looks like...

Photobucket

... and here is the pattern for my version. This is based on this crochet pattern, but it has some definite differences!

Ch 6, join with sl st in 1st ch to form ring.

Ch 5, tr, ch 1, hdc, ch 1, tr, ch 5, sl st in ring.

*Ch 5, sl st in each ch and into ring. Repeat from * once.

Ch 5, tr, ch 1, hdc, ch 1, tr, ch 5, sl st into ring.

Fasten off and weave in ends.
 
I really like how the wreath turned out!

Photobucket

Photobucket

Tuesday, April 12, 2011

the nursery {painting} and baby update {23 weeks}

We've started on the baby's nursery! Well, my husband, mom, and stepdad started on the nursery. I got kicked out because of primer and paint fumes.

We have three bedrooms in our home... our bedroom, the guest room, and what we lovingly call the "crap" room... half craft room, half office, half storage, half junk. We decided to make the crap room the new guest room and the "old" guest room is now the baby's room.

Last Friday night Hubby switched the rooms and cleaned out the new nursery. This picture is from before we moved in... the walls were a deep blue with some sort of white or gray sponge painting over it.

Photobucket

Saturday, my mother and stepfather came up to help paint and install the chair rail. We chose pink for the top and a tan for the bottom, with the chair rail being higher than average at about 55 inches. We dubbed it the "chin rail". Guess whose chin it's at? Yep. Mine. I'm short.

Photobucket

Painting went really fast, considering they had to prime it and paint two colors. The chair (chin) rail went up Sunday morning. It looks great!

Photobucket

And Big Bunny is ready to greet Baby!

Photobucket

We ordered the crib and dresser, and they should come in the next week or so. I also picked up a cute piece of artwork that incorporates the alphabet and I'm working on a couple of projects that will go up on the walls. Hurray!

Now for the update:
Baby is kicking like crazy! She's moving all around and doing somersaults in my belly.

I've been feeling really good... my energy is back, which is good because as the end of the school year approaches I'm going to need it!

My craving for milkshakes and cereal has diminished. I had gained four pounds at my last doctor's appointment three weeks ago, and I'm pretty sure one was Baby and the other three were milkshakes. :)

Photobucket

You know what's funny? Every time the baby kicks, I yell for Hubby to run over and put his hand on my belly so he can feel too. Problem is, she stops kicking! Poor Hubby, he hasn't been able to feel her yet.

My stomach looks HUGE to me when I look down and see it sticking out, but in pictures it doesn't look that big. Some people at work who didn't know I was pregnant were tiptoeing around, asking other people so they didn't offend me in case I was just getting fat, lol.